Perform In-Call Functions
Take a Secure Payment with PADLOCK
Consult With Another Party During The Call
Create a Three- or Four-Way Conference
Note: some of the above features may not be available in your organisation.
Mute the Call
- Do one of the following during the call, depending on which telephone device you are using.
|
Telephone Device |
Do this |
|
Web iPath |
Click the Mute Call |
|
PSTN device or storm-registered deskphone |
Click the mute button on the device. |
 button on the
 The connected party can no longer hear your voice.
- To unmute the call, click Unmute
 .
.
Adjust the Call Volume
- Do one of the following during the call, depending on which telephone device you are using.
|
Telephone Device |
Do this |
|
Web iPath |
Click the Volume control |
|
PSTN device or storm-registered deskphone |
Use the volume controls buttons on the device. |
 button on the
 - (Web iPath users) Adjust the volume by either clicking on the slider, or by clicking and dragging the circle along the slider.
![]()
For incremental control, either click the plus  or
or  minus buttons, or press the keyboard arrow keys when the circle is in focus (it is in focus when bordered by a light blue line as pictured above).
Place the Call on Hold
- Click the Hold Call
 button on the Comms Panel - Phone Tab.
The other party is placed on hold and hears hold music. A timer is displayed to remind you how long the call has been placed on hold.
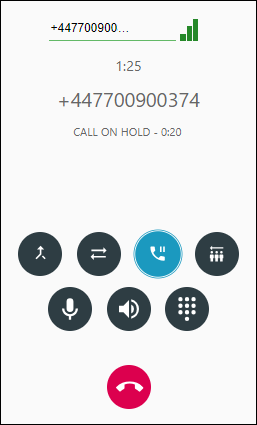
- To resume the call, click the
 button.
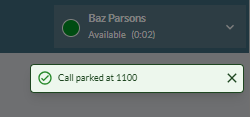
Park the Call
You can park an external incoming call in an available waiting area (a call park) for later retrieval by yourself or another storm user. This places the party on hold automatically and shows you the dial-in number of the call park as configured by your storm administrator. You then send this number to storm users or external parties who you want to allow to continue with the call.
- During the call, click the Transfer
 button on the Comms Panel - Phonebook/Contacts Tab.
The other party is placed on hold and hears hold music.
- Click the Park Call button.
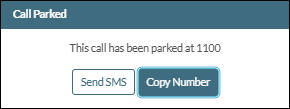
On being placed in an available call park, the external party hears hold music and you are removed from the call and placed in the Available status. The call park dial-in number is displayed in a message immediately below your Availability Status Panel for a few seconds.
Depending on an internal configuration setting, the dial-in number may also be shown in a dialog (see below), which persists until you click a button in the dialog.
If this dialog is not displayed, you must write down or memorise the dial-in number shown in the message before it disappears and then share it with users who you want to allow to continue with the call.
- If the dialog is displayed, perform one of the following actions:
|
Action |
Instructions |
|
Copy the call park number to the clipboard |
Click the Copy Number button and then paste the number into another application for sending to storm users who you want to allow to continue with the call. |
|
Text the call park number directly to one or more mobile numbers |
Available to users who are permitted to compose SMS text messages. Click the Send SMS button to display the SMS - Compose Panel. Note: the button is not displayed if the 'SMS - Compose Panel' is already open. In the panel's To field, enter the mobile phone numbers of the users who you want to allow to continue with the call. If required, edit the predefined text message and then click the |
 button to send it.
For instructions on how to retrieve a parked call, see Retrieve a Parked Call.
Note: if the parked call is not retrieved by the time its call park timeout duration has elapsed, it will be routed to you again.
Record the Call
Click the  button on the Main Title Bar to record the conversation. Recording continues until you click the
  button or when the call clears. Depending on your organisation's settings, you may not be able to restart recording once you have stopped it. You may hear a beep tone when recording starts and ends.
Your button may be configured to pause and resume call recordings instead of starting and stopping them. See Call-Handling Panel for more information.
Note: you will not be allowed to control call recording if your system is configured to record all of your calls or if an integrated application controls recording.
Requeue the Call
Click the Put Back in Queue  button on the Comms Panel - Phone Tab.
The call disconnects and the caller is returned to the queue they came in from.
Provide Requested Data
If a Call Information Panel is displayed with the call, you might be required to enter one or more items of data that you have collected during the call. This data is used by the call-routing service when your call ends to perform a particular action (such as route the caller to another destination).
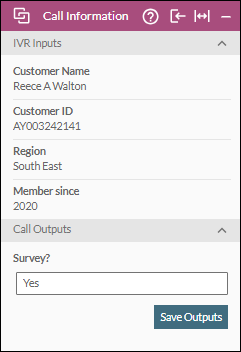
Enter the data in the required fields and then click the Save Outputs button. You can edit the data as many times as you wish during the call — only the most recently saved data is sent to the service at the end of the call.
End the Call
- Do one of the following during the call, depending on which telephone device you are using.
|
Telephone Device |
Do this |
|
Web iPath |
Do one of the following:
|
|
storm-registered deskphone |
Do one of the following:
|
|
PSTN device |
Press the the call end button on your paired device. |
 button on the DTA
 Depending on your settings, you may be placed in wrap following the call and a Wrap panel displayed alongside the Comms panel. While you are in this status you will not be available to handle further calls. Your wrap status may last for a configurable period of time, until you select a completion code, or until you manually mark yourself as available. In some deployments, a Wrap-up Countdown Timer may be displayed in the main title bar.
- If the Wrap Panel is displayed, select a completion code that best sums up the call. This might be presented in a list or as a set of buttons, such as 'Interested, but not this season'; or depending on your settings, a text box may be available to record information such as an account number.
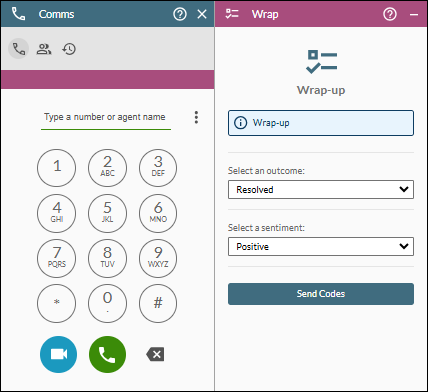
- If prompted to select a sentiment, select a sentiment category that allows you to tag the outcome of the interaction with a value (typically positive, negative or neutral).
- Click the Send Codes button to commit the selected code(s) and sentiment. This does not apply if you have selected a completion code button.