Take a Secure Payment With PADLOCK
PADLOCK is a PCI-compliant card payment solution, allowing you to take credit and debit card payments in a secure environment and to submit them to a payment service provider for authorisation. If you have the right to take card payments, you will see the  button on the Interactions panel during a call.
A customer may be allowed to split a payment over multiple cards (if this option is enabled).
Procedure
- At the point in a call when you wish to take a secure payment, click the button on the Interactions panel. This displays the PADLOCK Panel. Ignore this step if the panel is opened automatically by a third-party application such as a CRM system.
Note: during a PADLOCK interaction, you cannot place the the call on hold, transfer the call, return the call to the queue, or conference-in a third party.
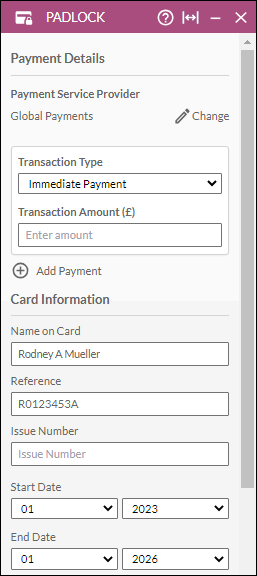
- Depending on how your system is configured, you may be allowed to change the default payment service provider. If so, click the
 Change button and then use the displayed drop-down field to select a different provider. In some systems, this change may be allowed once only in a call.
Click the  button to commit the change.
The fields that are displayed further below in the panel vary depending on the selected payment service provider.
- Use the Transaction Type drop-down list to select the type of payment.
Note: the transaction type may be limited to 'Create RCP token' for your payment service provider. With this method, you will take the customer's card details but no payment. The system will generate a token (a Payment Service Reference), which the customer can then use to make payments on another system outside storm without having to provide their card details again.
- Type or select the details provided by the customer in the Transaction Amount (if applicable), Name on Card, Reference, Issue Number (if applicable), Start Date (if applicable), and End Date fields. Enter any further details that are required by the payment service provider.
Note: depending on how your system is configured, some fields may be populated already.
- (Not applicable to the 'Create RCP Token' transaction type) If you want to take a payment of a different type with this payment card (for example, a pre-authorisation payment), click the Add Payment button, which is located at the bottom of the Payment Details section. Then, select the Transaction Type and enter the Transaction Amount for the additional payment.

Repeat this step to add further additional payments for this card. You can add up to three.
Note: to split a payment across different payment cards, you must complete the first payment and then use the New Payment button as instructed in step 9.
- Click the Request Card Number button. The 'Call Locked' indication appears below the Card Details section and the phone line is muted indicating that the call is locked in readiness for the customer to securely enter the card number using their telephone keypad. You will see the entered digits as a series of asterisks on the screen.
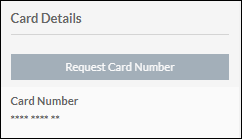
Note: if the customer allows the timeout period to expire without entering the complete number, the call is taken out of locked mode and the entry fails validation. Click the Request Card Number button again to prompt the customer to re-enter the card number.
- When a green tick appears, indicating that the customer has completed the card number entry correctly, speak to the customer and then click the Request Security Code button. Once again, the 'Call Locked' indication appears and the phone line is muted in readiness for the customer to enter the card's security code. Again, you will see the entered digits as a series of asterisks.
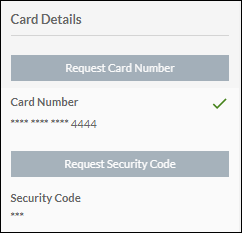
Note: if the customer allows the timeout period to expire without entering the security code, the call is taken out of locked mode and the entry fails validation. Click the Request Security Code button again to prompt the customer to re-enter the code.
- When a green tick appears, indicating that the customer has completed the security code entry correctly, click the Authorise button to submit the payment information to the payment service provider for authorisation. If the Authorise button does not appear to work, you have not provided mandatory information. Scroll up through the panel to identify the missing information (indicated by messages displayed in red). Provide the information and then click the button again.
If, on submission, you are presented with surcharge information, click the Accept Surcharge button to include the surcharge amount in the total payment.
Depending on a configuration setting, a payment summary is displayed in the panel along with an indication of whether the payment succeeded. (See also, If a Transaction Fails, below.)
Once the details have been authorised and the transaction has succeeded, a unique Payment Service Reference number for the transaction may be returned by the payment service provider.
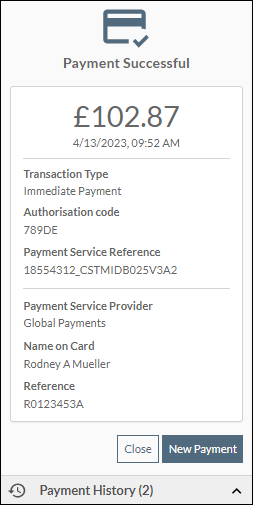
Note: for a 'Create RCP token' transaction type, the Payment Service Reference is the generated token, which you should share with the customer so that they can use it to make payments on another system outside storm.
- If the payment succeeded and the customer wants to make another payment, click the New Payment button below the payment summary, and then proceed as you did for the previous payment.
A payment summary is displayed after each payment is submitted for authorisation.
- If available, click the
 button at the bottom of the panel to see the history of transactions in this call.
Note: transferring the call to another agent (after closing the PADLOCK panel for PSTN-paired and deskphone users) transfers the payment history to the receiving agent.
If a Transaction Fails
On clicking the Authorise button, the system checks that all mandatory information has been entered and will highlight any fields that have not been completed. If necessary, amend the information and press the Authorise button again. The details are submitted to the payment service provider for authorisation.
If the payment fails because the authorisation attempt is rejected or because the details provided cannot be verified, a message is displayed. You may also see a Retry button, which, when clicked, returns you to the Payment Details section of the panel, where you can re-enter the details if required.
If the transaction fails because of a technical problem, the system will return the following message:
"Do Not Resubmit, Payment status unknown, contact your payment service provider".
If you see this message, you will not be able to resubmit the payment. Contact the payment service provider to find out if the transaction succeeded.
If required, you can click the New Payment button to initiate a new transaction.
You can click the Cancel Payment button at any time to cancel the transaction.
Note: you may not be allowed to retry a failed payment or initiate a new one if the PADLOCK panel is controlled by a third-party application such as a CRM system.