PADLOCK Panel
This is accessed by clicking the  button on the Interactions panel during a call. In some configurations, it may also be opened automatically by a third-party application such as a CRM system.
Use this panel to take PCI-compliant credit and debit card payments from the customer.
You can operate this panel by using your mouse or keyboard (see Accessibility Features).
|
|
|
|
|
||||||||||
|
|
|
Panel help and control buttons |
|
||||||||||
|
|
|
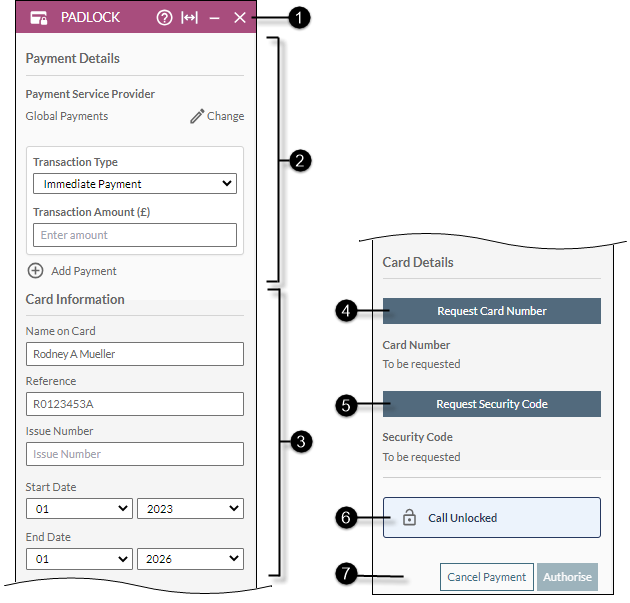
Payment Details |
Payment Service Provider Displays the name of the default payment service provider configured for your organisation. The Note: in some deployments, this field may be labelled differently (for example, 'Payment Interface' or 'Merchant Account'). Transaction Type Use this to select the type of transaction. For example, 'Immediate Payment'. Transaction Amount Use this to enter the amount that the customer is paying. The currency is determined by the payment service provider you are using. (This field is not applicable to the 'Create RCP Token' transaction type.)
Clicking this button displays an additional Transaction Type and Transaction Amount field to allow you to add a payment of a different type with the same payment card:
In this additional payment section of the panel, the Clicking the |
||||||||||
|
|
|
Name on Card (mandatory) Use this to enter the name of the customer as it appears on their card. Reference (mandatory) Use this to enter a reference for the payment. Issue Number (if applicable) Use this to enter the card's issue number. Start Date (if applicable) Use the drop-down list to select the card's Start date. End Date (mandatory) Use the drop-down list to select the card's End date. |
|||||||||||
|
|
|
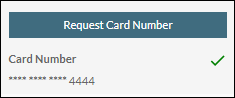
Request Card Number button |
Click this to take the customer's card number. The call is locked (the phone line is muted) and the customer is played an audio prompt asking them to enter their card number. Asterisks appear below the button as the customer enters the digits of the card number.
A green tick indicates that the customer has entered the card number correctly. |
||||||||||
|
|
|
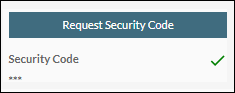
Request Security Code button |
Click this to take the customer's card security code. The call is locked (the phone line is muted) and the customer is played an audio prompt asking them to enter their security code. Asterisks appear below the button as the customer enters the digits of the security code.
A green tick indicates that the customer has entered the security code correctly. |
||||||||||
|
|
|
Call Locked/Unlocked Indicator |
|
||||||||||
|
|
|
Payment buttons |
These buttons are enabled when the card number and security code have been entered correctly.
|


 Add Payment (not applicable to the 'Create RCP Token' transaction type)
 button cancels the additional payment by hiding the additional payment fields.