Comms Panel - Phonebook Tab/Panel
Subject to user rights.
This is accessed by clicking the  button on the Toolbar and then the panel's
  Phonebook button.

Note: in some deployments, the tabbed Comms Panel is not available. Instead, the Phonebook is provided in a standalone panel, accessible from the toolbar. If you prefer this setup, consult your local support desk. The Phonebook tab/panel is not available to you if you are seeing the Comms Panel - Contacts tab/panel.
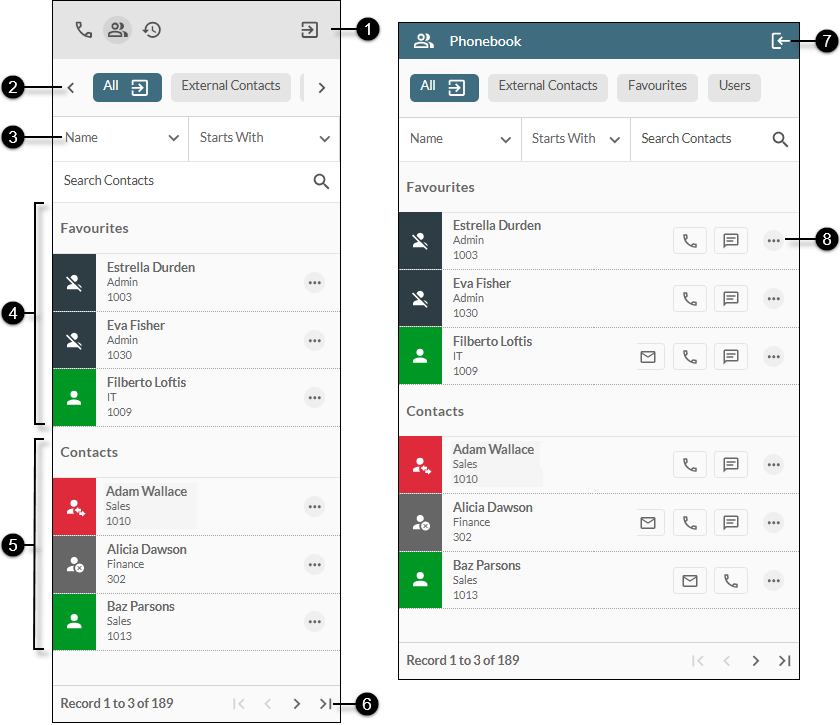
Use this tab to see and manage your Phonebook contacts. A Phonebook is organised into a series of tabs, where each tab displays one or more types of contact such as storm users, external contacts, personal contacts, queues, or hunt groups as configured by an administrator.
|
|
Clicking this displays this Help page in a separate window. |
|
|
Hides the Comms panel. You can restore it by clicking the |


 Comms button on the
 You can display the Phonebook as a tab within the Comms panel or as a wider standalone Phonebook panel as illustrated below.
|
|
|
|
|
||||||||||||||||||||||||||||
|
|
|
Popout Phonebook button |
Pops out the Phonebook tab as a standalone Phonebook panel. |
||||||||||||||||||||||||||||
|
|
|
Phonebook tabs |
Displays Phonebook contacts in various categories. The tabs and contacts that you see here are configured by your administrator. Use the Note: you can configure a Phonebook tab to auto-display on DTA login. See Select a Phonebook to Display on DTA Login. Depending on your configuration, a particular Phonebook tab can also be displayed on receiving some calls and interactions. |
||||||||||||||||||||||||||||
|
|
|
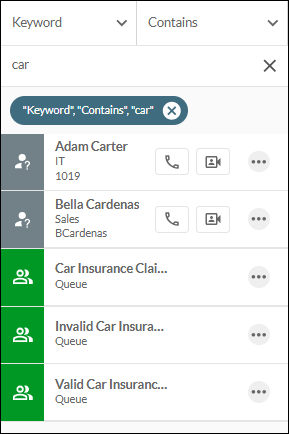
The 'Keyword' option allows you to perform a single search across all phonebook fields for all contacts on the tab. With this option selected, choose a condition selector (such as 'Starts With' or 'Contains'), followed by at least two characters of the full or partial keyword to search on. This is illustrated below with the keyword 'car'. The contacts list updates immediately, with the search chip displayed directly above the list.
Clicking the Note: searching on the Agent Group field works slightly differently to the other fields. See Searching Agent Groups further below. You can refine your search by including multiple searches. This can be a combination of no more than a single keyword search plus any number of searches on particular fields. An example multiple search is illustrated below.
Removing a search item by clicking the search chip's Note: the simple keyword search returns results across all fields, including those not available in the drop-down list of fields. |
|||||||||||||||||||||||||||||
|
|
|
Favourite Contacts list |
Displays contacts that you have marked as favourites. The symbol and colour indicates the current availability status of the contact (see Contacts List, below). Note: this list is displayed only on a Phonebook tab that displays every user, queue, internal, and external contact. A storm administrator may have configured a separate tab to display your favourite contacts. |
||||||||||||||||||||||||||||
|
|
|
Displays your organisation's contacts. For storm users, their user group (typically, their department) and extension number are shown. For other contact types, appropriate information such as external contact number, or queue name is shown. Administrators who cannot log in to DTA are not displayed in the list. A contact's symbol and colour indicates the type of contact and their status, where relevant. Users
Queues
Other Entities
|
|||||||||||||||||||||||||||||
|
|
|
Pagination buttons |
Indicates the number of contacts who are currently in view and the total number of contacts in your contacts list. Use the arrow buttons to see contacts who are not currently visible in the panel.
|
||||||||||||||||||||||||||||
|
|
|
Collapse Phonebook button |
Reverts the display of the standalone Phonebook panel to a tab in the Comms Panel. |
||||||||||||||||||||||||||||
|
|
|
|
|||||||||||||||||||||||||||||


 and
and  buttons to navigate to offscreen tabs. Clicking a tab's
  button pops out that tab as a standalone panel. You can pop out up to three tabs. Clicking a popped-out tab's
  button in the title bar reverts the display of the panel to a tab in the Phonebook panel. You can change the display order of your Phonebook tabs. See
 button allows you to search on a particular field, either by selecting a condition selector followed by the item to search on, or by selecting from a list of defined items (such as a user group).
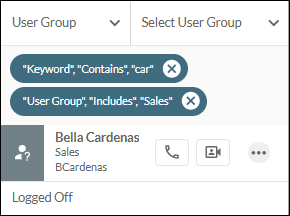
 button changes the search result immediately.


 button copies the address to the clipboard so that it can easily be pasted into To and Cc fields when composing emails. You can also drag the email address into these fields.


 button (next to their name), or anywhere on their name, or the
  button below their details.
Searching Agent Groups
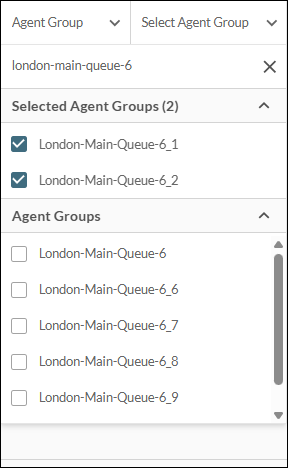
When searching across agent groups in an organisation with a very large number of groups (typically hundreds), up to 200 results are displayed in a scrollable list. Selected agent groups are moved above the list to make selection management easier:
See Also
Make an Outgoing Call (By Selecting the Contact)
Configure Your Organisation Phonebook (administrators only)