Configure Your Organisation Phonebook
Administrators only
You can set up your organisation's Phonebook with categories (or tabs) of your choice and make each tab available to storm user groups (typically departments in your organisation) of your choice.
Note: the Phonebook tab/panel is not available to you if you are seeing the Comms Panel - Contacts Tab.
Bulk Import External Phonebook Contacts
Filter Settings For Popular Phonebook Tab Configurations
Create Phonebook Tabs
To create a Phonebook tab, do the following:
- In the Toolbar at the left of the DTA main application window, click the
 button to display the Settings Window.
 - In the Settings window, select Phonebook Management.
- Select Tab Configuration and then click the
.png) Add New Phonebook Tab button. This displays the Add Tab page.
Add New Phonebook Tab button. This displays the Add Tab page. - In the Tab Name field, enter a unique and meaningful name for the tab.
- Use the User Groups drop-down list to control which user groups will be allowed to see the new Phonebook tab. Open the drop-down list by clicking it, select the user groups, and then close it. Each selected user group appears as a deletable chip in the drop-down field (see illustration further below).
- In the Show Fields Applicable To section, choose one or more of the following options:
|
Option |
Effect |
|
Users |
Limits the selectable choices presented in the controls of this configuration page to those related to storm users. |
|
External Contacts |
Limits the selectable choices presented in the controls of this configuration page to those related to external contacts. |
|
Treatments |
Limits the selectable choices presented in the controls of this configuration page to those related to storm treatments. |
Note: these options do not control whether these contact types will display on the tab.
- Select the For Favourites option if you are setting up a favourites tab for your users. For each user, this tab will display each contact that the user has marked as a favourite.
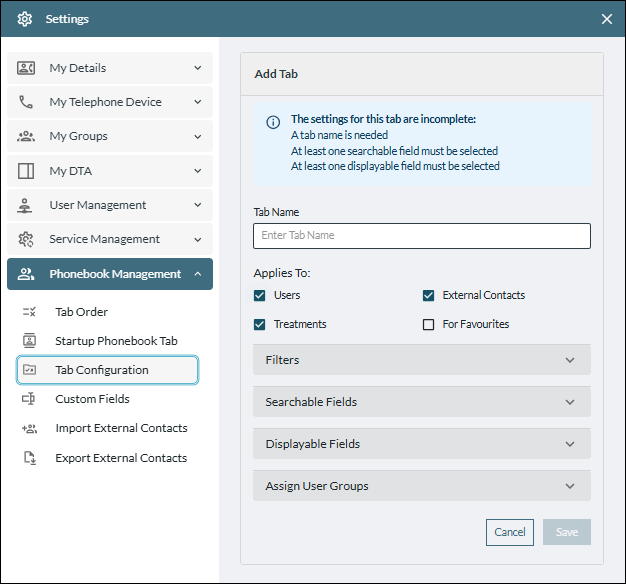
- Use the Filters section to determine which contacts and other items will appear on the Phonebook tab.
Open the Filters section. Click the Add Filter button and then select a filter type. Open the Select Values drop-down list by clicking it, select the filter values, and then close it. Each selected filter value appears as a deletable chip in the drop-down field.
Note: you must include at least one filter.
|
Filter Type |
Applies to |
|
Agent Group |
Users |
|
Contact Type |
Users, treatments, internal contacts, and external contacts. A typical configuration is to choose a single contact type (say 'users' if you want to display storm users only), or to choose all options if you want to display every type of contact. |
|
Treatment Type |
Treatments (see also, Treatment Types in storm). |
|
User Group |
Users |
|
<custom fields> |
Users and external contacts You can create custom Phonebook fields as described in Add Custom Phonebook Fields, later in this topic. |
If required, add more filters using the Add Filter button. See also, Filter Settings For Popular Phonebook Tab Configurations at the end of this topic.
- Use the Searchable Fields section to allow users of this tab to use particular fields in the Keyword and Field Search drop-down options list of the Phonebook tab/panel when searching for particular contacts.
Open the Searchable fields section. Open the Add Field drop-down list by clicking it, select the field values, and then close it. Each selected field value appears as a deletable chip in the drop-down field.
Note: you must include at least one searchable field.
If required, change the order in which the searchable fields will be displayed on the Phonebook tab. To this is, click a field's  or
or  button to move it up or down the list by one field position. Alternatively, click and hold a field's
  handle, then drag it up or down the list to the position indicated by the horizontal blue line.
- Use the Displayable Fields section to control which items of contact information are displayed when users of this tab click the
 Contact Details button against a contact on the Phonebook tab/panel.
Open the Displayable fields section. Open the Add Field drop-down list by clicking it, select the field values, and then close it. Each selected field value appears as a deletable chip in the drop-down field.
Note: you must include at least one displayable field.
If required, change the order in which the displayable fields will appear on the Phonebook tab. To this is, click a field's or button to move it up or down the list by one field position. Alternatively, click and hold a field's handle, then drag it up or down the list to the position indicated by the horizontal blue line.
- Click Save.
- Close the Settings window by clicking its
 button.
See also, Phonebook Tab Configuration Examples at the end of this topic.
Add Custom Phonebook Fields
A custom Phonebook field is a data type that extends beyond the standard data available to your users. You can create custom Phonebook fields for users, treatments, and external contacts. DTA users can populate custom fields for external and personal contacts themselves for display in their Phonebook as described in Create Personal and External Contacts.
Note: custom fields for users and treatments cannot be populated by DTA users — instead, they must be populated by you or another administrator in storm UC and CONTACT.
For example, as an administror in UC and CONTACT, you might create a custom Phonebook field named 'Multilingual?' exclusively for external contacts to store a 'Yes' or 'No' value. A DTA user can then include this field in their directory of external contacts and populate it with 'Yes' or 'No' for each contact. For users to see the custom field against their contacts, you must include it as a displayable field when creating a Phonebook tab.
To add a custom Phonebook field, do the following:
- In the Toolbar at the left of the DTA main application window, click the button to display the Settings Window.
- In the Settings window, select Phonebook Management.
- Select Custom Phonebook Fields and then click the New Custom Field button. This displays the Add Custom Field page.
- In the Name field, enter a meaningful name for the custom field.
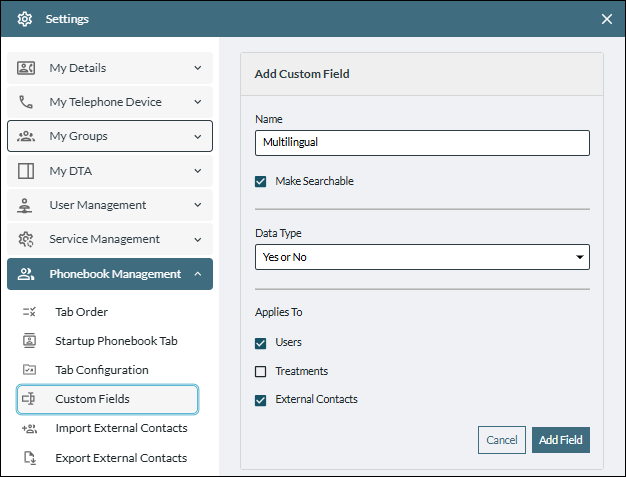
- Select the Make Searchable option if you want the custom field to be available to administrators in the Searchable fields section of the tab configuration settings page.
- In the Data Type drop-down list, select the type of data pertaining to the new custom field. If you select 'Drop-down List', add the options using the Add Option button.
- In the 'Applies To' section, select the check box next to any contact type for which you want this custom field to be available in the Displayable fields section of the tab configuration settings page when administrators configure a tab for that contact type.
- Click Add Field.
- Close the Settings window by clicking its button.
Bulk Import External Phonebook Contacts
This section tells you how to import lots external contacts to your organisation's Phonebook in a single operation. You can add up to 4000 contacts in this way.
Do the following:
- Prepare a CSV file containing the import data. The following table shows the supported fields.
The fields are allowed to appear in any order in the file. The standard field names must be spelled exactly as shown in the table. Custom field names must be spelled exactly as they exist on the system (see Add Custom Phonebook Fields above).
Note: field names are currently supported in the English language only.
|
Supported field |
Optional or mandatory? |
Supported data |
||||||||||||||||||||
|
External Contact ID |
Mandatory |
Leave blank for a new contact. |
||||||||||||||||||||
|
First Name |
Mandatory |
A string of alphanumeric characters. |
||||||||||||||||||||
|
Contact Type |
Optional |
This must be '2'. |
||||||||||||||||||||
|
Last Name |
Optional |
A string of alphanumeric characters. |
||||||||||||||||||||
|
Notes |
Optional |
A string of alphanumeric characters. |
||||||||||||||||||||
|
Personal Email Address |
Optional |
A string of alphanumeric characters. |
||||||||||||||||||||
|
Alternative Phone Number |
Optional |
|||||||||||||||||||||
|
Home Phone Number |
Optional |
|||||||||||||||||||||
|
Mobile Phone Number |
Optional |
|||||||||||||||||||||
|
Work Phone Number |
Optional |
|||||||||||||||||||||
|
<custom fields> |
Optional |
This depends on the fields' data types:
|
||||||||||||||||||||
Note: blank data for a field will result in the field being unpopulated on import.
The simple illustration below shows the contents of a CSV file for importing five new external contacts.
|
External Contact ID,Contact Type,First Name,Last Name,Mobile Phone Number |
Here, the External Contact ID field is blank for each of the new contacts; the third contact does not have a last name, meaning that nothing will be written to their Last Name field.
- In the Toolbar at the left of the DTA main application window, click the button to display the Settings Window.
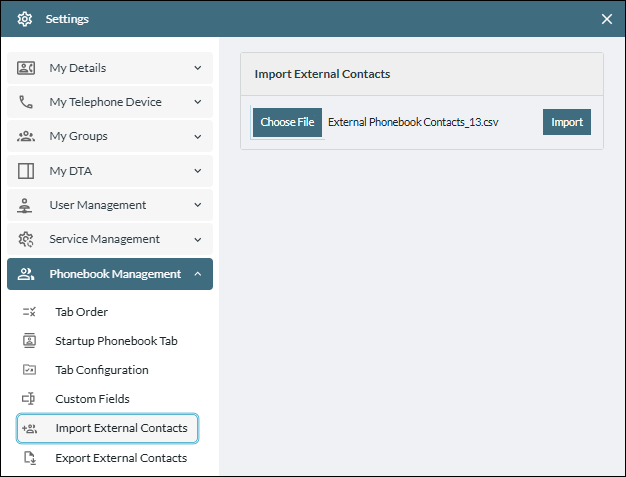
- In the Settings window, select Phonebook Management and then select Import External Contacts.
- Click the Choose File button and then browse for and select the CSV file in the Open dialog. The name of the selected file appears in the Settings window.
- Click the Import button.
- If any import error messages are displayed, correct the data in the CSV file and then re-import the file.
- Close the Settings window by clicking its button.
Note: if there are lots of external contacts in your Phonebook, and you want to make changes to many of them or import many more, it is recommended that you first export the external contacts as described in Export External Phonebook Contacts, and then edit the exported file accordingly. When editing the file, the 'External Contact ID' field for each new contact must be left blank. You can then import the file as described above.
Related Tasks
You perform all of following tasks in the Phonebook Management section of the Settings Window.
|
Task |
Procedure |
|
Edit a Phonebook tab |
This allows you to change any of the settings that were configured when the tab was created such as the type of contact to which the tab applies, the user groups to whom the tab is shown, the fields that should be displayed to users, and are searchable by them. Select Tab Configuration. In the list of Phonebook tabs, click the |
|
Delete a Phonebook tab |
Deleting a Phonebook tab removes it completely so that it is no longer available to users and administrators. Select Tab Configuration. In the list of Phonebook tabs, click the |
|
This allows you to to change the ordering of Phonebook tabs as seen in the Comms Panel - Phonebook Tab/Panel. Select Tab Order. In the list of Phonebook tabs that is displayed, the list position of a tab indicates its left-to-right order in the Comms Panel - Phonebook Tab/Panel. Use a tab's |
|
|
This allows DTA to pop out a particular Phonebook tab in a standalone Phonebook panel when you next log in to DTA. Select Startup Phonebook Tab. From the drop-down list, select the the tab to pop out on next log in. Click Save. |
|
|
Edit a custom field |
This allows you to change any of the settings that were configured when the custom field was created such as the field's name, its data type and applicability. Select Custom Phonebook Fields. In the list of custom fields, click the |
|
Delete a custom field |
Deleting a custom field removes it completely including all associated data that users have set against the field. The field will no longer be visible to users and administrators when they next log in to DTA and will no longer be available for selection on the Tab Configuration page when creating and editing a Phonebook tab. Select Custom Phonebook Fields. In the list of custom fields, click the |
 Edit button next to the Phonebook tab you want to edit. Make the required edits, and then click Save. (The settings are described in
  Delete button next to the tab you want to delete. On the Delete Tab page, type the full name of the tab that you want to delete (respecting case-sensitivity), and then click the Delete button.
Filter Settings For Popular Phonebook Tab Configurations
The following table illustrates Phonebook tab filter settings for some popular use cases. Detailed instructions are available in Create Phonebook Tabs earlier in this topic.
|
Tab |
Purpose |
'Applies To' Section |
'Filters' Section |
|
All |
To display all contacts |
Select 'Users', 'Treatments', and 'External Contacts' |
Add any filter except 'Contact Type'. |
|
Users |
To display storm users only |
Select 'Users' only |
Add the filter 'Contact Type' with value = 'Users'. Optionally, add any other available filters (for example, 'User Group'). |
|
External Contacts |
To display external contacts only |
Select 'External Contacts' only |
Add the filter 'Contact Type' with value = 'External Contacts'. Optionally, add any other available filters. |
|
Personal Contacts |
To display a user's external contacts only |
Select 'External Contacts' only |
Add the filter 'Contact Type' with value = 'Personal Contacts'. Optionally, add any other available filters. |
|
Queues |
To display queues only |
Select 'Treatments' only |
Add the filter 'Treatment Type' with value = 'Queue'. |
|
Favourites |
To display a user's favourite contacts only |
Select the 'For Favourites' option plus any of the other options depending on the type of favourite contact that you want to display on the tab. |
Add the filter 'Contact Type' with a value indicating the type of contact to display on the Favourite tab. Optionally, add any other available filters. |