Create Personal and External Contacts
You can create your own personal contacts for display on the Comms Panel - Contacts Tab or the Comms Panel - Phonebook Tab/Panel (whichever is configured for your organisation). These are visible to you only. Your administrator may also have allowed you to create external contacts in a preconfigured external directory, which are visible to all users in your organisation.
Procedure
- In the Toolbar at the left of the DTA main application window, click the
 button to display the Settings Window.
 - In the Settings window, select My DTA.
- Select Add Contacts.

- Complete the displayed fields. The fields that are displayed will vary depending on whether you are using the Phonebook feature.
|
Using the Phonebook Feature? |
Instructions |
|
Yes |
In the Contact Type field, select 'External Contacts' to create an external contact, or 'Personal Contacts' to create a personal contact. Complete the remaining fields as required. Any values that you provide must match the field type. For example, an email address must be a valid one. See also, Valid Address Formats. Any administrator-configured fields that are particular to your organisation are displayed at the bottom of the form. |
|
No |
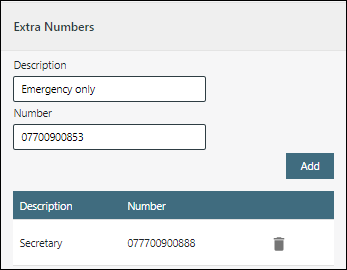
In the Directory field, select 'Personal' if you are creating a personal contact. Or, if you are allowed to create external contacts, select the name of the target external directory. Complete the remaining fields as required. Any values that you provide must match the field type. For example, an email address must be a valid one. See also, Valid Address Formats. If required, use the 'Extra Numbers' section at the bottom of the form to add further numbers for the contact. Entering a description, a number, and then clicking the Add button adds one extra number, which is listed below the fields. Repeat this for every extra number that you want to add.
|
- Click the Save button at the bottom of the panel.
- Close the Settings window by clicking its
 button.
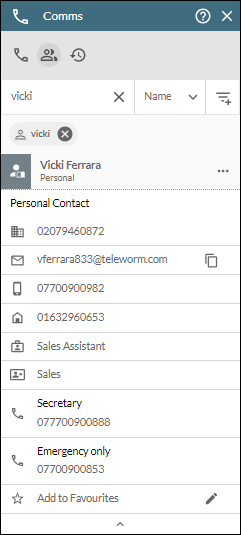
The contact now appears in your Comms Panel - Contacts Tab or Comms Panel - Phonebook Tab/Panel where they can be searched for like any other contact. Shown below is a user's personal contact as seen on the Contacts tab.
Edit or Delete a Personal or External Contact
- Ensure that the Comms Panel is displayed. If it is not, click the
 button on the Toolbar.
 - In the Comms Panel, select the
 Phonebook/Contacts Tab.
 - Identify the contact you want to edit or delete by using the panel's Search or filter controls. Click the contact's
 button to reveal their details in an expanded panel.
 - In the expanded panel, click the
 button. This opens the Settings Window.
 - To edit the contact, change the values in the desired fields and then click the Save button at the bottom of the window. Or, to delete the contact, click the Delete button and then confirm the deletion.
- Close the Settings window by clicking its button.