Email Panels
Email Reply/Reply & Follow Up/Forward/Email History Reply/Email History Forward/New Email Panels
You can operate these panels by using your mouse or keyboard (see Accessibility).
Email Panel
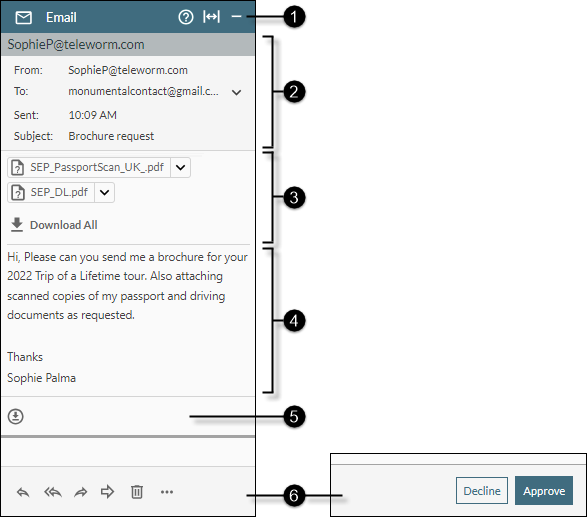
This is displayed automatically when you receive an email message. The panel closes only when the email has been actioned.
|
|
|
|
|
|||||||||||||||||||||||
|
|
|
Panel help and control buttons |
|
|||||||||||||||||||||||
|
|
|
Email details |
Displays basic details about the email. The |
|||||||||||||||||||||||
|
|
|
Displays any attachments that arrived with the email. You can download these individually or all at once. You can preview a plain text, JPEG, PNG, GIF, BMP, or PDF file attachment without downloading it. Note: any of the following special characters used in the attachment's file name are replaced by the underscore character in this panel. |
||||||||||||||||||||||||
|
|
|
Displays the incoming email message. Any previous messages and email notes in the interaction thread are also displayed below the incoming message (not shown in the illustration above). The |
||||||||||||||||||||||||
|
|
|
Downloads the email message and its attachments to your Downloads folder. The downloaded file has an EML file extension and the file name is system generated. Note: you cannot download an entire email conversation (email thread). The button is available for every incoming email message in a conversation. |
||||||||||||||||||||||||
|
|
|
Use one of these buttons to perform an action on the email.
If you are a supervisor who is allowed to intercept a sent message (via the storm supervisor approval system for trainee agents), use the following buttons to decline or approve such a message.
|


 Email button in the

 subthread button below each previous message shows or hides that item.

Email Information Panel
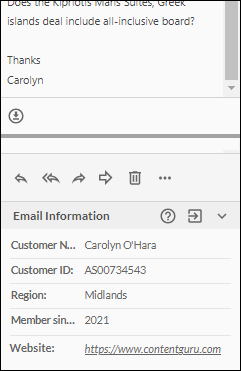
Some incoming emails may display information relating to the email such as the customer's details based on information gathered from a database.
This information appears in an information panel, which may be embedded in the Comms panel (as shown below) or displayed as a separate panel alongside the parent panel.
Email Reply/Reply & Follow Up/Forward/Forward & Follow Up/Email History Reply/Email History Forward/New Email Panel
The Email Reply, Forward Panel, Email History Reply, and Email History Forward panels are displayed to the right-hand side of the Email panel or the Email History panel when you click the ![]() ,
,  , or
, or  button in that panel.
Note: your administrator may have configured your system so that the Email Reply Panel opens automatically along with prepopulated reply details in relation to the incoming message.
The New Email panel is displayed when you click the  button on the Toolbar.
Shown below is the Email Reply panel. The other panels are similar.

|
|
|
|
|
||||||||||||||
|
|
|
Panel help and control buttons |
|
||||||||||||||
|
|
|
Email reply details |
Displays basic details about the email. Click the Cc and Bcc buttons to include additional recipients for the email you are sending. You can drag a contact's email address from the Comms Panel - Contacts Tab and drop it into the To and Cc fields. A default From address is provided. Some configurations may allow you to select an alternative 'From' address to show to the recipient. Note: Bcc provides a restricted list of email addresses as set up by Content Guru. |
||||||||||||||
|
|
|
Attachments |
Attachments that are currently included in your forward or reply message. Message attachments must not exceed 35MB; an individual attachment must not exceed 5MB; the number of attachments must not exceed 20; and filenames must not exceed 96 ASCII characters or 24 4-byte characters. Punctuation marks in filenames are replaced with an underscore. |
||||||||||||||
|
|
|
Attachments button |
Use this to include attachments in your message. Supported formats include BMP, DOC, DOCX, GIF, GRMX, JPG, PDF, PNG, RAR, TIF, TXT, WAV, XLS, XLSX, and VOX. |
||||||||||||||
|
|
|
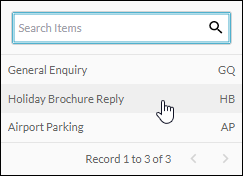
Displays a list, allowing you to select a predefined message template for insertion at the cursor point in the Reply message or Forward message field.
You can also press the keyboard Ctrl + / keys to display the list. To quickly find a particular template by name (or its alias name as shown on the right-hand side), select the 'Name' option and begin typing characters from the name in the Search Items field. To find a template by its content, select the 'Content' option instead. Hovering your mouse cursor over a template name displays a preview of its content. You may edit the template text after it has been inserted. |
|||||||||||||||
|
|
|
Formatting buttons |
Use these buttons to format your message.
|
||||||||||||||
|
|
|
'Enter a message' field |
Your message. |
||||||||||||||
|
|
|
Email Thread sub-panel |
Opens a panel, allowing you to edit all parts of the email thread when replying to or forwarding a message. |
||||||||||||||
|
|
|
Action buttons |
|

 button in the collapsed view of the panel).


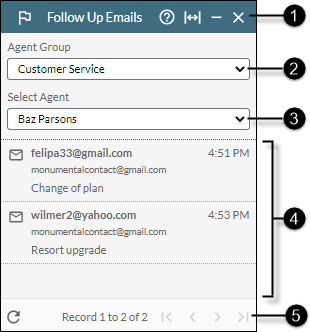
Follow Up Emails Panel
This is accessed by clicking the  button on the Toolbar.
Use this panel to follow up on emails that have been marked for follow up by any agent in an agent group of which you are a member.
|
|
|
|
|
||||||||||
|
|
|
Panel help and buttons |
|
||||||||||
|
|
|
Agent Group selector |
Use this to select the agent group of the agent whose follow-up emails you want to see. This is a list of all agent groups of which you are a member. |
||||||||||
|
|
|
Agent selector |
Use this to select an agent from the selected agent group. |
||||||||||
|
|
|
Follow up emails |
The emails that were marked for follow up by the selected agent. Clicking an email opens an Email - Follow Up panel so that you can handle it. |
||||||||||
|
|
|
Refresh and pagination buttons |
Indicates the number of follow up emails that are currently in view and the total number of follow up emails. Use the arrow buttons to see records that not currently visible in the panel.
|


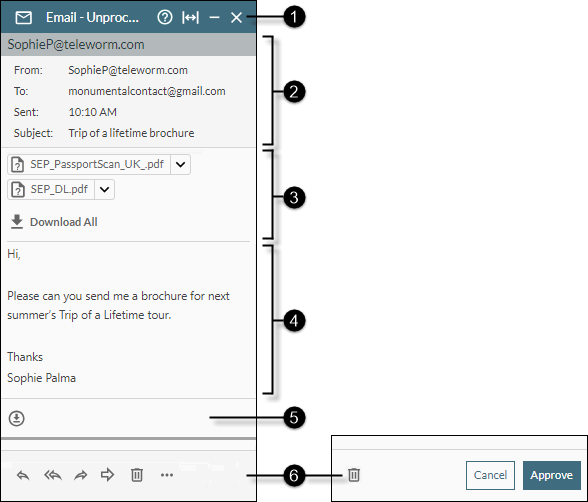
Email - Unprocessed Panel
This is accessed by clicking an unprocessed email in the Unprocessed Messages Panel.
Use this panel to handle unprocessed emails.
|
|
|
|
|
||||||||||||||||||
|
|
|
Panel help and control buttons |
|
||||||||||||||||||
|
|
|
Email details |
Displays basic details about the email. The |
||||||||||||||||||
|
|
|
Attachments |
Displays any attachments that arrived with the email. You can download these individually or all at once. You can also preview an attachment without downloading it. |
||||||||||||||||||
|
|
|
Displays the incoming email message. Any previous messages and email notes in the interaction thread are also displayed below the incoming message (not shown in the illustration above). The |
|||||||||||||||||||
|
|
|
This is available immediately below every incoming email message in a conversation and downloads that message along with any attachments that arrived with the message. The file has an EML file extension and is saved to your Downloads folder. Note: you cannot download an entire email conversation (email thread). |
|||||||||||||||||||
|
|
|
If you are an agent, use one of the following buttons to perform an action on the email. These buttons are not available if the email is awaiting approval by your supervisor.
If you are a supervisor who previously prevented an agent's message from being sent to its destination (via the storm supervisor approval system for trainee agents), use the following buttons to perform the desired action.
|