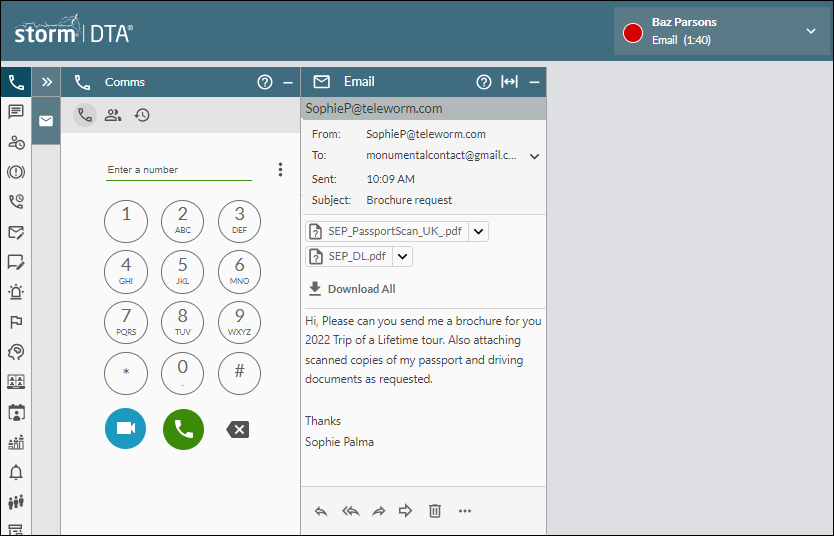
Handle an Incoming Email
When an email is routed to you, the message, along with its history, appears in an Email Panel. Your availability status changes to 'Email setup' and then to 'Email', automatically.
Note: you can also handle historical and unprocessed messages by opening them from the History Panel and the Unprocessed Messages Panel, respectively.
The Email Panel may display some additional information relating to the email, or you may be prompted to enter one or more items of data required by the email-routing service. See Email Information Panel. If the Web Launcher feature is enabled, a preconfigured web page may be launched on a separate browser tab when the message is routed to you.
Procedure
- If the email contains any attachments, preview and/or download them as required.
To preview a text, graphic, or PDF file attachment, select its  button and then select Preview from the context menu. This displays the attachment in a preview window. To close that panel, click its
  button.
To download a single attachment, select its button and then select Download from the context menu.
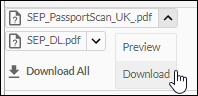
To download all attachments at once, click the Download All button.
Alternatively, you can download the message (including any attachments) to a single EML file by clicking the  Download EML File button that is located below the message.
- If required, add a note to the email by clicking the
 button near the bottom of the Email panel and then selecting the Notes option from the menu. This displays the Email Notes sub-panel below the Email panel.
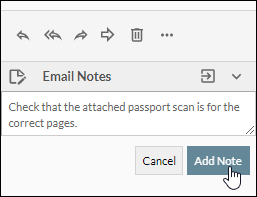
Type your note and then click the Add Note button. The note is attached to the message as seen further up in the panel. You can add further notes using the Add New button as required. Click the Close button to close the sub-panel. The note will also be seen in the Email - History panel by any user who opens the email from the Comms Panel - History Tab.
- Perform one of the following email actions:
|
Action |
Method |
|
Reply to the message |
Note: the To initiate a reply to the sender only, click the This displays the Email Reply Panel. In the panel, type your reply in the Reply message field. Note: to help you work more efficiently, your administrator may have configured your system so that the Email Reply Panel opens automatically along with prepopulated reply details that are related to the incoming message. This may include some or all of the following: one or more 'To' and 'CC' addresses; a 'From' address; a subject; and a reply message. You can change these details as required. If required, do any of the following (some of these features are subject to user rights):
To remove an attachment, click its
Click the |
|
Tag the message for follow up |
Tagging the message for follow up adds it to the list of follow up emails allowing you or any other agent in an agent group of which you are a member to deal with the message later. If you wish, you can reply to the message or forward it whilst tagging it for follow up. Click the |
|
Forward message to another destination |
Click the This displays the Email Forward Panel. In the panel, use the To field to type the email addresses of the target recipients. If required, do any of the following (some of these features are subject to user rights):
To remove an attachment, click its
Click the |
|
End the conversation without replying |
Click the |
|
Send the message to the queue it came in from |
Click the |
|
Click the
In a long list of queues, you can use the Search Items field to look for a particular queue. Click the Confirm Redirect button. |
|
|
Ignore the message |
Click the |
|
Delete the message |
Click the |
|
Approve or decline the email |
(Supervisors only) If the Approve and Decline buttons are displayed, your administrator has authorised you to intercept emails sent by your trainee agents. Click one of these buttons as appropriate. |
 Reply button. Or, to initiate a reply to all email addressees, click the
  Reply All button.
 Email Templates button or press the keyboard Ctrl + / keys to insert predefined text into the reply. If you accidentally select the wrong template, you can use the keyboard Ctrl + Z keys to undo the insertion.
 Attach button to include attachments in the message.
  button to the right of the From field to present an alternative origination email address to the recipient.
 Preview button to see how the formatted email will appear to the recipients.
 button to send the reply. You will be placed into the 'Wrap-up' or 'Available'
  Redirect button and then select the queue from the list of options.
- If a timeout warning is displayed, either click the Keep Open button to continue working on the email. If you do not click this button, the email message will be requeued automatically.
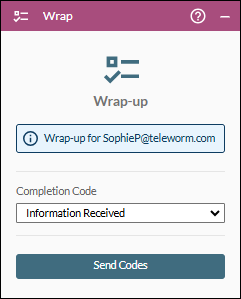
- Depending on your action and your system configuration, you may be placed in the Wrap-up status automatically. A Wrap Panel may be displayed prompting you to select one or more options to indicate the outcome for your interaction. Select the options and then click the Send Codes button.
Note: in some deployments, a Wrap-up Countdown Timer may be displayed in the main title bar.