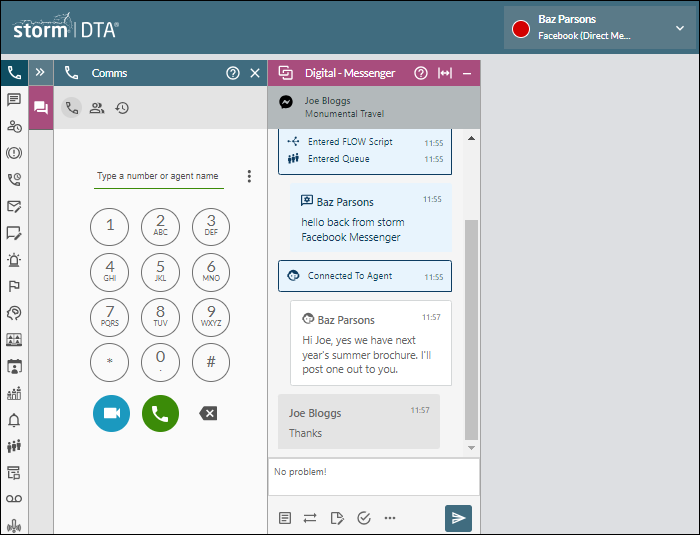
Handle an Incoming Web Chat or Social Media Message
When a web chat or social media message is routed to you, the message appears in a Digital Panel. Your availability status changes to a setup status and then to the status of the digital channel, automatically.
Note: any additional information relating to the interaction may be displayed in a sub-panel at the bottom, or you may be prompted to enter one or more items of data required by the web chat or social media routing service. If the Web Launcher feature is enabled, a preconfigured web page may be launched on a separate browser tab when a social media message is routed to you.
Procedure
- To see earlier interactions with this contact, click the Previous session button at the top of the panel.
- If required, add a note to the interaction by clicking the
 button near the bottom of the panel. This displays the New note sub-panel.
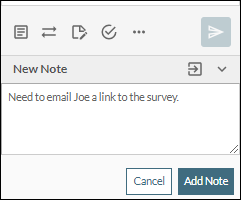
Type your note. Click the Add Note button and then click the Close button to close the sub-panel. You can add further notes if required. The note will be seen in the History panel by any user who opens the interaction from the Comms Panel - History Tab.
- Perform one of the following actions:
|
Action |
Method |
|
Reply to the message |
Prepare your reply in the field labelled 'Start typing...' near the bottom of the panel. Your reply can be text or an attachment. For text, type the reply in the field. Click the To include an attachment, click the Click the Note: if your organisation uses an individual or queue based alias, this will be sent instead of your agent name. |
|
Send the message to the queue it came in from |
Click the Note: this button is NOT available for an interaction that arrived through a queue of the legacy ‘Social Media’ channel type, as such interactions cannot be requeued. The panel closes automatically. |
|
Click the
Note: if an interaction arrived through a queue supporting the legacy ‘Social Media’ channel type, you may transfer it to a queue supporting that interaction’s channel type. For example, you may transfer a Messenger interaction that arrived through a ‘Social Media’ queue to a ‘Messenger’ queue only. The panel closes automatically. |
 Templates button or press the keyboard
  button and then select the Insert Attachment command.
 button to send the reply.
 Transfer to Queue button and then, from the context menu, select a queue that supports the same type of interaction.
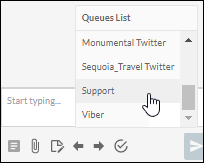
- If a timeout warning is displayed, either click the Keep Open button to continue working on the message. If you do not click this button, the message will be requeued automatically where possible.
- To end the conversation, click the
 Close button.
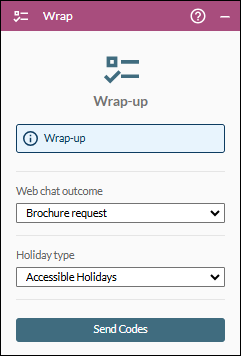
 - Depending on your action and your system configuration, you may be placed in the Wrap-up status automatically. A Wrap Panel may be displayed prompting you to select one or more options to indicate the outcome for your interaction. Select the options and then click the Send Codes button.
Note: in some deployments, a Wrap-up Countdown Timer may be displayed in the main title bar.