Create a Message Template
To communicate more efficiently and consistently with your contacts, you can create templates for textual messages that you need to send frequently, either as replies to incoming messages or in new messages. The illustration below shows an agent inserting a message template named 'New Brochure' into a new email that they are composing. You control which agents have access to your templates by assigning each template to an agent group.
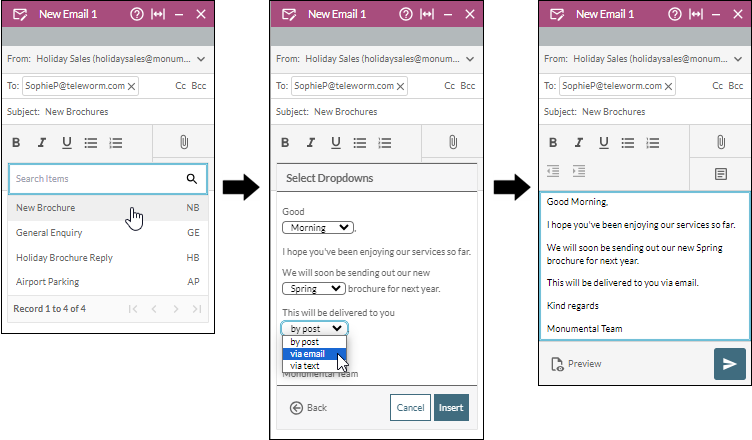
You can optionally configure dropdowns in the message templates that you create. A dropdown is a list of options that presents a choice of words or phrases for allowing agents to tailor their messages to their target destinations. In the illustration above, the 'New Brochure' template is designed with three dropdowns. An agent who is using a message template with dropdowns must either accept the default option in each dropdown or select a different option.
This topic also covers the following:
Create Template Dropdown Categories
Procedure
Note: if you want to create new dropdowns for insertion into your message template, follow the instructions in Create Template Dropdowns first.
- In the Toolbar at the left of the DTA main application window, click the
 button to display the Settings Window.
 - In the Settings Window, do one of the following, depending on whether or not you are a Phonebook user:
|
Phonebook user? |
Instructions |
|
Yes |
Select Service Management and then select Manage Templates. |
|
No |
Select Message Templates and then select Templates. On the Templates page, click the |
- Type a name for the new template in the Template Name field,
- If the template is to be available for use by all channels, leave the All check box selected. If it is not, then clear the All check box and select the channel(s) that can use the template. (The channels that appear in this list depend on your organisation's settings.)
- Type the template text in the Message field. Use the buttons above the field to format the message as required.
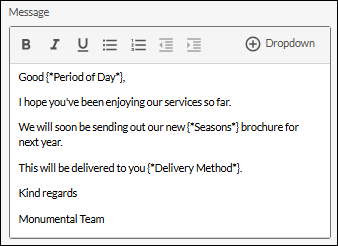
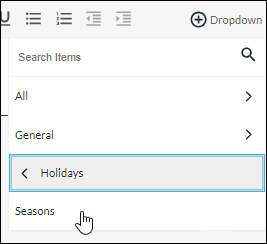
If the .png) Dropdown button is displayed, then at least one dropdown has been configured for insertion into message templates. To insert a dropdown at a particular location in your template text, click this button and then select a dropdown from a category (categories are indicated by
Dropdown button is displayed, then at least one dropdown has been configured for insertion into message templates. To insert a dropdown at a particular location in your template text, click this button and then select a dropdown from a category (categories are indicated by  and
and  symbols). If you know the name of a dropdown or a category, find it quickly by typing its name in the Search Items field. In the illustration below, the user is selecting the 'Seasons' dropdown from the 'Holidays' category.
The dropdown is inserted at the location of the text cursor as a non-editable element comprising the name of the dropdown in a pair of curly braces and asterisks as shown in the illustration further above. Here, the user has inserted three template dropdowns named 'Period of Day', 'Seasons', and 'Delivery Method' to allow users of the template to select options from these dropdowns when they compose their messages. You can select and copy a dropdown element to the clipboard for insertion elsewhere in this or another message template.
- (Supervisors only) Use the Category drop-down list to select a message template category. This is for restricting the template to particular agent groups.
- (Optional) In the Shortcut field, provide an abbreviated alias name for the template. This will allow you and other agents to quickly find this template by typing all or part of this name.
- Click Save.
The new message template is now available to agents when they compose text-based messages.
- Close the Settings window by clicking its
 button, or by clicking anywhere outside the window within the main application window.
Create Template Dropdowns
A template dropdown is a list of options that appears at a particular location in template text and allows agents who are using the template to select one of these options instead of typing words. For example, you might create a dropdown named 'Seasons' containing the options 'late spring', 'summer', 'autumn', and 'early winter'.
Note: if you want to create a new category for your dropdowns, follow the instructions in Create Template Dropdown Categories first.
- In the Settings Window, do one of the following, depending on whether or not you are a Phonebook user:
|
Phonebook user? |
Instructions |
|
Yes |
In the Service Management section, select Template Dropdowns. |
|
No |
In the Message Templates section, select Dropdowns. |
- Click the Add Dropdown button.
- Type a name for the new dropdown in the Template Dropdown Name field and then select the category for the new dropdown. If there are no categories to select, the dropdown will be placed in the default 'All' category.
Type the first option in the Option 1 field exactly as you want it to appear in the dropdown list when seen by agents.
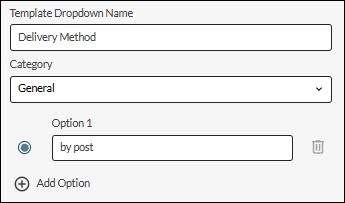
- Click the Add Value/Add Option button to add the second and subsequent options.
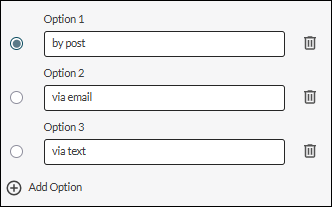
Click the option button next the dropdown that you want to make the default option. The selected dropdown will be selected automatically for the user of the template. If you do not select an option, then Option 1 will be marked as the default when you save the dropdown.
- When you have added all options, save the dropdown by clicking the Add/Add Dropdown button.
The new dropdown is now included in the list of dropdowns and ready for insertion into any new or existing message template.
- If required, create more dropdowns by clicking the Add Dropdown button.
Create Template Dropdown Categories
Template dropdown categories allow you to organise your template dropdowns into groups to facilitate their search and management. If you do not have any template categories, then all template dropdowns are placed in the default 'All' category.
- In the Settings Window, do one of the following, depending on whether or not you are a Phonebook user:
|
Phonebook user? |
Instructions |
|
Yes |
In the Service Management section, select Template Dropdowns and then click the Categories tab. |
|
No |
In the Message Templates section, select Dropdown Categories. |
- Click the Add Category button.
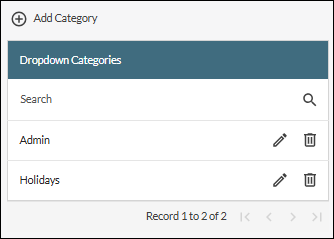
- Type the name of the new category in the Dropdown Category Name field.
- Assign dropdowns to the category by selecting their check boxes.
- Click the Add/Add Category button. The new dropdown category is now available to your template dropdowns.
Note: if template dropdowns already exist, they are listed below the category name and you can choose which ones to include or exclude from this new category.
- If required, create more categories by clicking the Add Category button.
Related Tasks
You perform all of following tasks in the Settings Window.
|
Task |
Procedure |
|
Edit a message template |
This allows you to change any of the settings that were configured when the template was created, such as the text and dropdowns in the template, and the communication channels to which it applies. (Phonebook users) Select Service Management and then Manage Templates. From the options list at the top of the page, select the message template you want to edit (Non-Phonebook users) Select Message Templates and then Templates. Click the template's (All users) Make the required edits, and then click Save. |
|
Delete a message template |
Deleting a message template means that it will no longer be available for agents to use when composing messages. (Phonebook users) Select Service Management and then Manage Templates. From the options list at the top of the page, select the message template you want to delete and then click Delete. (Non-Phonebook users) Select Message Templates and then Templates. Click the template's (All users) Confirm the deletion. |
|
Edit a template dropdown |
This allows you to add and remove the option items in a template dropdown. (Phonebook users) Select Service Management and then Template Dropdowns. (Non-Phonebook users) Select Message Templates and then Dropdowns. (All users) Click the Edit the options as required. Click Note: agents must log out of DTA and then log back in to see the effect of this change. |
|
Delete a template dropdown |
Deleting a template dropdown means that it will not be available for selection in new message templates. Any instances of the dropdown in existing message templates will not be removed. (Phonebook users) Select Service Management and then Template Dropdowns. (Non-Phonebook users) Select Message Templates and then Dropdowns. (All users) Click the Confirm the deletion. Note: agents must log out of DTA and then log back in to see the effect of this change. |
|
Edit a template dropdown category |
You can change the name of a category or change the dropdowns that are assigned to it. (Phonebook users) Select Service Management and then Template Dropdowns. Click the Categories tab. (Non-Phonebook users) Select Message Templates and then Dropdown Categories. (All users) Click the If required, edit the name of the category. To change the dropdowns assigned to the category, select the check boxes next to the dropdowns you want to include in the category and clear those next to the dropdowns you want to remove.
Click Save/Save Changes. |
|
Delete a dropdown template category |
Use this to remove any categories that are no longer needed. Any template dropdowns that are currently assigned to this category will be moved to the default 'All' category. (Phonebook users) Select Service Management and then Template Dropdowns. Click the Categories tab. (Non-Phonebook users) Select Message Templates and then Dropdown Categories. (All users) Click the Confirm the deletion. |
 Delete button.
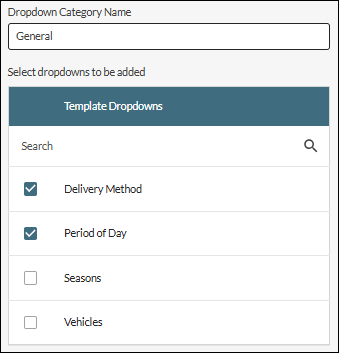
See Also
Create a Message Template Category (supervisors only)